A few months ago I was running tracks (and stage managing and the monitor engineer) for half•alive, on tour opening for twenty one pilots.
The playback session I ran fired tracks, cued 6 different instrument’s patch changes, & (no joke) ran the lights. To put it plainly, the show would not have been able to happen to the caliber and brilliance that it did without the specific gear we used.
Now there’s a lot of fantastic devices out there that you can use for running tracks during your worship service. In fact, we released an article a little while back with a breakdown of all the different ways you can run tracks.
A Simple L/R audio split from an iPad to a full on 10 channel dual laptop redundant rig ableton setup. Here’s the link to that article!
But today I want to share exactly what I used with half•alive & how you can use the same thing to make your tracks experience at church flawless and hassle-free.
Before I continue with the topic of the blog I want to give a huge shoutout to Brett, J. Tyler, Josh, and their entire team for being a dream to work with! Who they are as humans is absolutely phenomenal. Their music is incredible and their live show is truly mind-blowing! I can not express enough, you have to see one of their lives shows.
Now, the rig we used…
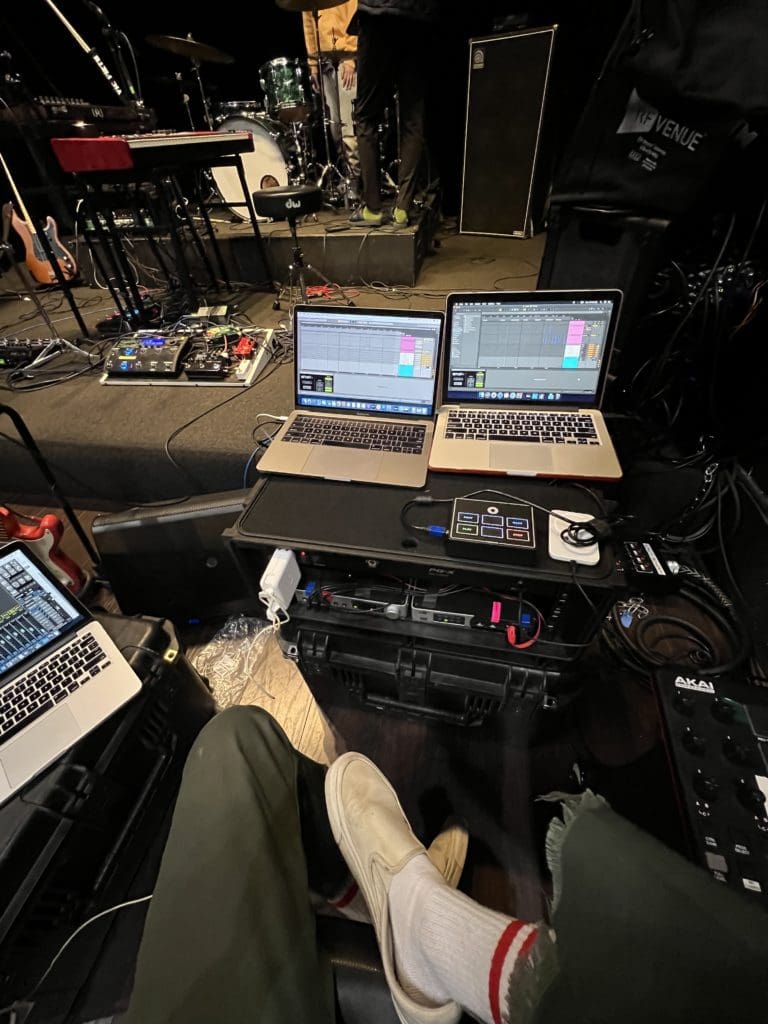
This is a rig that I’ve used in a few other settings and has become a pretty standard setup for playback engineers.
The Interface – iConnectivity Playaudio12
The DAW – Ableton Live 11 Suite
The Controller – Oaktone Mini
The Playback Plugin – Setlist by Strange Electronics
The Daw
If you aren’t familiar with Ableton Live, it’s a recording program that was initially created for DJs to perform with. When it comes to live tracks playback, the user interface is incredibly friendly and there are a lot of features built into it that make running tracks a smooth and effortless experience.
The Best Interface For Worship I’ve Ever Used
The iConnectivity Playaudio12 is a 10-channel output playback interface that supports running two computers simultaneously. This allows you to have what many refer to as a “redundant rig”. If computer A fails and the tracks glitch or stop, the PA12 automatically switches to computer B. This feature alone has saved me sooooooo many times!
How it works is on the front of the PlayAudio12 there is a USB slot for computer 1 & computer 2 to plug into. But there is also what’s called a “host port”. This host port is how both computers work at the same exact time.
What you do is connect a midi controller to the host port & within Ableton assign play, stop, next song, etc. to each of the buttons. Then when you hit the button on the midi controller that’s assigned to “play”, it tells computer 1 & 2, at the same time, to start playing. This allows you
The Controller
For the longest time, people would use all kinds of different devices to achieve this. A 25-key midi controller keyboard, a nanoPAD2, MPD218, etc.. but now there are phenomenal devices made for this specific use. The one that I personally love is the Oaktone Mini.
Why I think it’s perfect for playback is because the buttons are specifically labeled “play” “stop” “next” “previous” and have color coordinated lights too.
When it comes to something as important as tracks, the last thing you want to do is risk the wrong button getting selected and completely derailing the song. Over the years I’ve tried taping on labels, sharpie markers, etc. and they are temporary, unreliable solutions.
Plus what i love about the oaktone is all of the buttons are programmed with a 100 ms debounce rate to avoid double-firing a command (Been there. Super annoying.)
The Playback Plugin
Lastly, this is the mindblowing part of the whole operation. For years I have run tracks utilizing a master session where I drop in the tracks for literally every song we lead in service. This has been a phenomenal tool for being able to use tracks and flow instantaneously into other songs that weren’t already in the setlist. The only issue was…I’d have to feverishly scrub through the session to locate the song.
No matter how amazing I was at labeling or coming up with creative solutions for this, it was always a nightmare. Plus, programming the setlist into my midi controller was never a fun process either.
But then I came across the plugin, Setlist, by Strange Electronics…
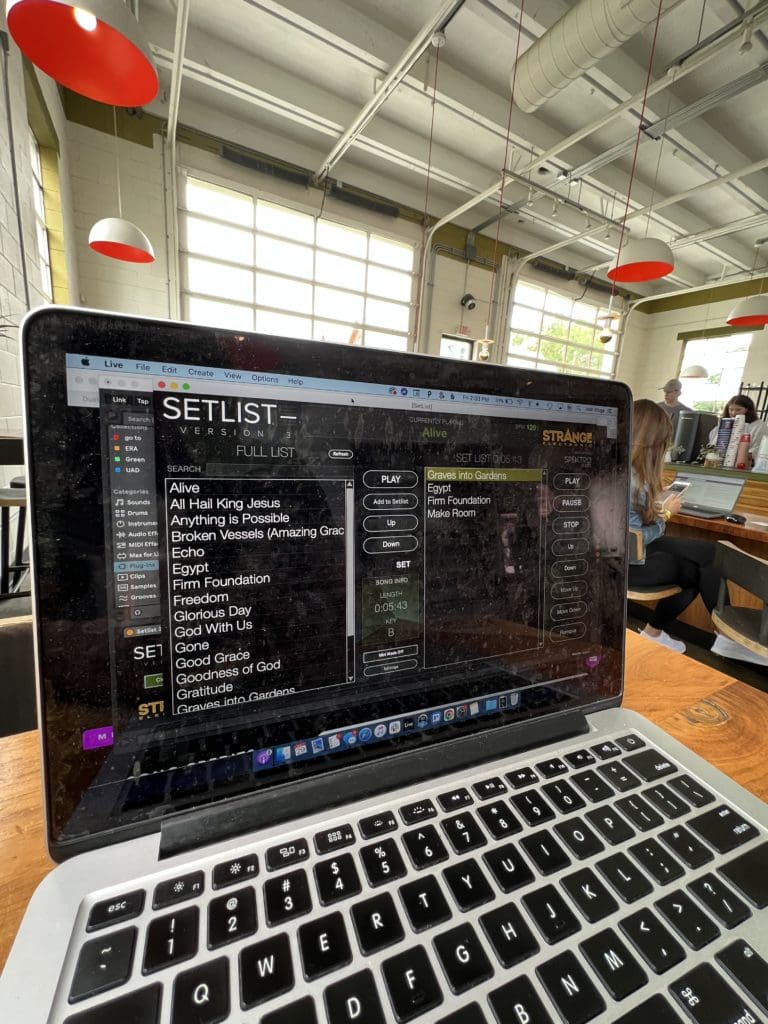
This plugin creates a list of all the songs in my session, with a searchable finder, and then allows me to create my own setlist, in whatever order I want, based off of that master list. Once the song ends, the cue marker moves to the next song in the set list and awaits me to cue it (unless you don’t want to cue it and setup your own transition into the next song).
I can not express enough how phenomenal it is to be in the middle of a set, get the cue that we are going to jump into a different song than expected and boom! I am ready to go within seconds. But also, having a clean interface that simply shows me what song is playing with a midi controller that I can jump in and out of Setlist with, should I want to quickly monitor the Ableton session.
The final thing I’ll say..
Tracks can be incredibly intimidating and sometimes unpredictable. In some churches the playback computer is playing the tracks, controlling auto-tune, switching patches on pianos and pedalboards, firing the lyrics, and running the lights; so ensuring this device is reliable and easy to use is crucial.
The investment I made into this entire setup has allowed me to near forget about the computer on stage and focus completely on engaging in the set.
FREE Video Series On Creating Worship Keyboard Sounds From Scratch
Click here to check out the FREE video series on building keyboard sounds from scratch!
You may also be interested in these posts as well:
- Keys Rig Rundown: Gear & Software
- Creative Synths & Spontaneous Keys with McKendree Tucker (Keyboardist for Kari Jobe)
- Using Drones and Playing Keys in Worship with Matt Stanfield (Keyboardist for The Belonging Co.)
- Worship Synth Bass Setup + Tips & Tricks With Tom Furby (Hillsong Y&F)

